May 5, 2026 | By TruLight of the Midlands
5 Landscape Lighting Design Tips Every SC Midlands Homeowner Should Know
Good landscape lighting does more than make your yard visible after dark. It highlights the features you invested in, extends your usable outdoor hours, and adds a layer of security that keeps your family safer. For homeowners in Camden, Columbia, and the South Carolina Midlands, the right lighting design also works with the region's specific conditions: clay soils, mature hardwoods, long summer evenings, and yards that get heavy use from spring through fall.
The difference between a professional landscape lighting design and a handful of solar stake lights from the hardware store is not just brightness. It is intention. Every fixture in a well-designed system has a purpose, a reason for its position, its angle, and its intensity. Here are the five design principles that separate great landscape lighting from the kind that makes you squint or stumble.
1. Use Three Layers of Light
Professional lighting designers work with three distinct layers, and getting the balance right between them is the single biggest factor in how your yard looks and feels at night.
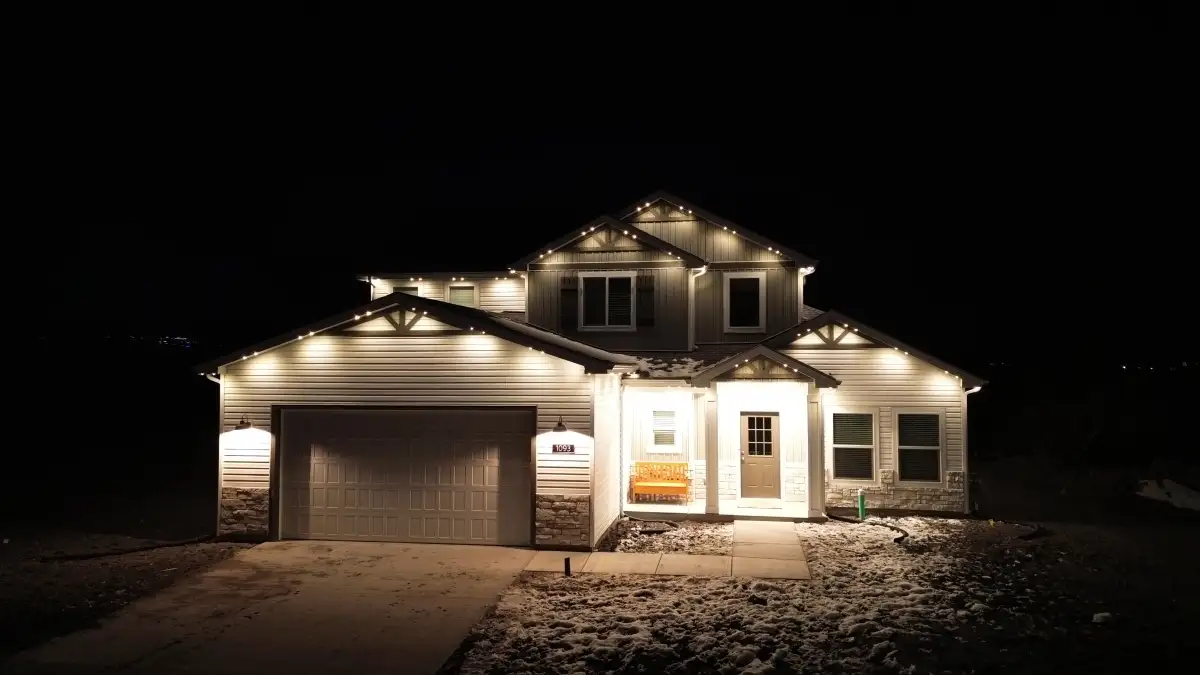
Ambient lighting provides the overall base illumination. This is the layer that lets you see where you are walking, where the furniture is, and where the yard ends. For most Midlands properties, ambient light comes from downlights mounted under eaves, permanent roofline lighting set to a warm white, or broad-beam fixtures on poles or walls near entertaining areas.
Task lighting focuses on functional zones. The grill area, the back door, the garage walkway, and the driveway all need targeted illumination bright enough to see what you are doing. Task lighting is purposely brighter than ambient and concentrated in a smaller area. Under-cabinet LEDs in an outdoor kitchen, a spotlight above the back steps, or a focused downlight over a workbench in the garage all qualify.
Accent lighting is where the design comes alive. Uplights on a live oak trunk, a wash of light across a stone retaining wall, a silhouette effect behind ornamental grasses, or a narrow spotlight on a water feature. Accent lighting draws attention to specific features and creates visual depth. Without it, a yard looks flat. With it, the same yard has dimension, drama, and personality.
Most homeowners default to one layer, usually ambient, and crank it up until everything is visible. The result is a yard that feels like a parking lot. Layering gives you control over mood and function simultaneously. You want the pathway visible but not glaring. You want the patio bright enough to eat dinner but relaxed enough to sit and talk afterward. Three layers make that possible.
2. Pick the Right Color Temperature
Color temperature is measured in Kelvin (K), and it has a bigger impact on the feel of your outdoor space than most people realize. Here is the practical breakdown for landscape lighting in the Midlands.
Warm White (2700K)
This is the standard recommendation for most residential landscape lighting installations. Warm white produces a soft, golden glow that mimics candlelight and early-sunset tones. It flatters brick, stone, wood siding, and stucco, which covers the majority of home exteriors in Camden, Columbia, and Lexington. It also attracts significantly fewer insects than cooler temperatures, which matters during the long South Carolina bug season from April through October.
Neutral White (3000K-3500K)
Slightly crisper than warm white, neutral works well for task zones like outdoor kitchens, driveways, and workspaces where you need clearer visibility without the clinical feel of daylight. Some homeowners in the Midlands use neutral white along driveways and warm white everywhere else for a subtle contrast that guides the eye.
Cool White (4000K+)
Avoid this for landscape lighting in almost every residential application. Cool white creates a sterile, commercial appearance and draws bugs aggressively. The one exception is security lighting at the perimeter of your property, where the brightness and blue-shifted tone actually serve a purpose as a deterrent. Even then, motion activation keeps the exposure brief.
Consistency matters. Mixing warm and cool temperatures across the same sightline creates a jarring, disjointed feel. Pick a primary temperature for your property and use it across all ambient and accent fixtures. Reserve a different temperature only for isolated functional zones that guests rarely see at the same time as the rest of the yard.
3. Position Fixtures for Effect, Not for Convenience
Where you mount a fixture determines what kind of light effect you get. The same spotlight creates completely different results depending on its angle and distance from the target. Here are the four core placement techniques used in professional landscape lighting design.
Uplighting
A fixture on the ground aiming upward at a tree, column, or wall. Uplighting is the most dramatic technique in landscape lighting. It reverses the natural direction of light (we are used to light coming from above), which makes trees, architectural features, and tall plants look striking and larger than life. For properties with mature live oaks, magnolias, or crepe myrtles, two or three uplights at the base of a canopy tree can define an entire yard.
Downlighting (Moonlighting)
A fixture mounted high in a tree or on a structure, angling downward. This creates soft, dappled shadows on the ground below that mimic natural moonlight. Moonlighting is the most flattering outdoor lighting effect available. It works especially well on properties in Camden and Blythewood where mature trees provide natural mounting points 15 to 25 feet above the ground.
Cross-Lighting
Two fixtures on opposite sides of a feature, each angling inward. Cross-lighting eliminates harsh shadows and reveals the full three-dimensional texture of stonework, garden walls, and sculptures. It is the go-to technique for textured hardscape features like retaining walls, pillars, and masonry columns.
Silhouetting
A fixture behind a plant or object, aiming toward a wall. The feature appears as a dark shape against a bright background. This technique turns ornamental grasses, Japanese maples, and other plants with interesting shapes into focal points without revealing fine detail. It creates a clean, modern look that works well on contemporary Midlands homes with light-colored siding or stucco.
The common mistake is pointing fixtures directly at features from the front at eye level. Front-lighting flattens everything, eliminates texture, and creates glare for anyone looking toward the fixture. Professional designers avoid it in favor of the four techniques above.
4. Think About What Happens in Every Season
South Carolina's Midlands region has four distinct seasons, and your landscape changes with each one. A lighting design that only looks right in summer misses the point. Here is what to plan for.
Spring (March-May): Azaleas, dogwoods, and flowering shrubs peak in the Midlands. If you have specimen plantings, position accent lights to highlight blooms during their peak weeks. Spring evenings are mild and are when many homeowners start using outdoor spaces again after winter. This is also the ideal time to install new landscape lighting before the summer rush hits.
Summer (June-August): Full canopies, long evenings, and heavy outdoor entertaining. Uplights and moonlights in deciduous trees produce their richest effects when leaves are full. Bug-resistant warm white temperatures matter most during these months. The best landscape lighting designs incorporate smart controls so you can shift brightness and scheduling as sunset times move later through June and start pulling back in August.
Fall (September-November): Changing foliage brings temporary color shifts. Uplights on maples, oaks, and sweetgums catch fall color beautifully. As leaves drop, previously hidden fixtures and wiring become visible, so clean installation matters year-round. Halloween and Thanksgiving celebrations give homeowners another reason to adjust their lighting scenes through the app.
Winter (December-February): Bare branches, earlier sunsets, and holiday season. Leafless trees benefit from uplighting that showcases branch structure and bark texture. Holiday lighting displays integrate with landscape lighting for a cohesive look rather than a collection of unrelated elements plugged into different outlets. Pathway lighting gets heavier use as daylight shrinks to under 10 hours.
The practical takeaway: design your landscape lighting for winter first. If the design looks strong with bare branches, no leaves, and short days, it will look even better the rest of the year when foliage, flowers, and long evenings add natural beauty on top.
5. Do Not Over-Light Your Yard
This is the most common mistake homeowners make, and it is counterintuitive. More light does not equal better lighting. It usually means worse lighting.
Over-lighting creates glare, washes out the contrast that makes a yard interesting, and produces light trespass that annoys neighbors. It also runs up your electric bill for no benefit. Professional landscape lighting uses the minimum wattage necessary for each fixture to achieve its intended effect.
A well-lit property has dark areas. That sounds wrong, but it is essential to good design. Your eye needs contrast to perceive depth and dimension. A uniformly bright yard looks flat and institutional. A yard with pools of light, graduated transitions, and intentional shadows looks inviting, layered, and sophisticated.
Here are the practical guidelines we follow on every installation in the Midlands:
- Pathways: 100 to 200 lumens per fixture, spaced 8 to 10 feet apart. Enough to walk safely, not enough to read a newspaper.
- Uplights on trees: 300 to 600 lumens depending on canopy size and height. A 40-foot live oak needs more light than a 15-foot crepe myrtle.
- Wall washes: 200 to 400 lumens per fixture, positioned 12 to 18 inches from the wall base, angled at 15 to 30 degrees upward.
- Accent spotlights: 150 to 300 lumens, narrowly focused. The beam width matters as much as the brightness.
- Step and deck lights: 50 to 100 lumens. These are wayfinding fixtures, not area lights.
Every lumen above what you need subtracts from the design rather than adding to it. When in doubt, go dimmer. You can always install a slightly brighter bulb later. You cannot un-glare a neighbor's bedroom window once the fixtures are set.
The Midlands Advantage: Your Yard Is Already Built for Great Lighting
Homeowners in the South Carolina Midlands have a natural head start when it comes to landscape lighting. The region's mature tree canopies, mixed hardscape-and-softscape yards, and relatively flat terrain provide ideal conditions for every lighting technique in the book. Live oaks in Camden and longleaf pines across the Sandhills create natural vertical elements that uplighting was designed for. The red clay soil common across Columbia, Lexington, and Irmo holds fixture stakes firmly once installed. And the long outdoor living season means you get more value per dollar from a landscape lighting investment here than homeowners in regions where winter keeps them inside six months a year.
The combination of warm evenings, mature landscapes, and outdoor-oriented lifestyles makes the Midlands one of the best markets in the Southeast for professional landscape lighting. If your neighbors are already lit, you know why. If they are not, you are about to have the best-looking property on the street.
Get a Free Landscape Lighting Consultation
TruLight of the Midlands provides free on-site consultations where we walk your property at dusk, assess your landscape features, and design a custom lighting plan based on your yard, your budget, and how you use your outdoor spaces. We serve homeowners across Camden, Columbia, Lugoff, Elgin, Lexington, Irmo, Blythewood, Chapin, Sumter, and the surrounding Midlands communities.
Every installation is handled personally by our team with no subcontractors. We are a family-owned, owner-operated business, and we treat your property the way we would treat our own.